 |
 |
The Procedure
The process of getting tattooed in a reputable tattoo parlour involves a considerable amount of time spent reviewing artists portfolios, working on the design, and finally sitting in the chair and having the work done. It is important to be familiar with what constitutes a safe tattooing environment and to have complete confidence in your artist.
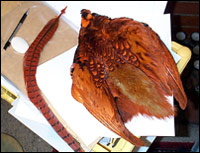
For my work, I had several drawings showing the wings that I wanted in some detail. I had based these images off the structure of a wing from a pheasant skin that I purchased in a fishing lure shop. The wing was chosen because of the brilliant colours of the feathers, which were similar to the phoenix imagery I was wanting to produce.
After examining six or seven tattoo parlours I decided upon Tattoo Magic, and an artist called Claudia who's work impressed me. Claudia and I discussed the imagery that I wanted, what the tattoo meant to me, and what I hoped to get out of it. She recommended that I extend the image down over my waist, enlarging the flame area at the base of the image to cover the curves on my back.
Tattoos are applied using a machine designed for the purpose. Tattoo guns have remained very similar to the original design, patented in 1896, perhaps because the method itself has not changed over much - ink must be embedded into the skin. The machine causes a needle or band of needles to inject the ink at high speed. The tattoo pigment is inserted into the skin cells in the epidermis and new skin grows over the top, thus forming a protective layer over the ink. My outline used a five-needle band and was reasonably painful. The interior colours used a thirteen-needle band and did not hurt as much as the outline. I found that the first one and a half hours of each session were tolerable and that I could usually talk and joke with Claudia and my partner. As the session wore on and I became more tired I would begin to require breaks and eventually would become exhausted enough that I had to stop for the night. After each session, Claudia would put a hot towel on my back, cover it with an antiseptic ointment, and I would go home covered in plastic wrap, which was about as uncomfortable as it sounds. After four hours, the wrap would be removed and I would wash off the ointment - a fairly painful process - before covering it in bepanthen. I required bepanthen three times a day for two weeks to keep the skin moist and ensure that the tattoo healed correctly. During this time, the skin above the tattoo work would begin to peel off in rather attractive coloured strips and then heal underneath - a normal part of the process. My back job took nine months in total to complete. |
 The
studio must be clean and professional and the tattooist must abide
by a range of safety procedures regarding sterilisation, disposal
of needles, and so on. Any non-disposable instrument that is involved
in the process must be autoclaved, and a responsible tattooist will
explain the process to you and demonstrate the safety rules they
follow. If cost is an issue, then reconsider having a tattoo at
all - it is certainly advisable to pay more to achieve the highest
quality in safety and design.
The
studio must be clean and professional and the tattooist must abide
by a range of safety procedures regarding sterilisation, disposal
of needles, and so on. Any non-disposable instrument that is involved
in the process must be autoclaved, and a responsible tattooist will
explain the process to you and demonstrate the safety rules they
follow. If cost is an issue, then reconsider having a tattoo at
all - it is certainly advisable to pay more to achieve the highest
quality in safety and design. I pencilled
a number of examples and finally refined the sort of shape that
I wanted to see done. I took a number of digital photos of my back,
and montaged the image onto it to see how it looked, then adjusted
the drawing and finally inked and coloured the wings I had produced.
I pencilled
a number of examples and finally refined the sort of shape that
I wanted to see done. I took a number of digital photos of my back,
and montaged the image onto it to see how it looked, then adjusted
the drawing and finally inked and coloured the wings I had produced.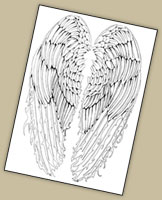 Claudia
used a stencil to paste first one, then a week later the other,
wing over my back. This made a blue outline which she could follow
and allowed her the chance to reposition the pattern if necessary.
Once I was happy, the work could begin.
Claudia
used a stencil to paste first one, then a week later the other,
wing over my back. This made a blue outline which she could follow
and allowed her the chance to reposition the pattern if necessary.
Once I was happy, the work could begin.